Use a numeric input to change the value of a specific variable. You can use this to highlight an important variable in the model, or one where the starting value has a significant impact on the results.
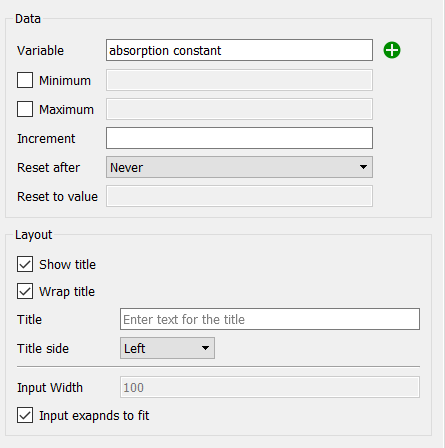
Variable specifies the variable the numeric input will control. Begin typing and autocomplete suggestions will appear, or click on the ![]() , then select the variable you want from the find dialog that appears.
, then select the variable you want from the find dialog that appears.
Minimum specifies the minimum value the numeric input can take on. Below this threshold, user inputs will be set to this value.
Maximum specifies the maximum value the numeric input can take on. Above this threshold, user inputs will be set to this value.
Increment specifies the amount the numeric input can change. User inputs will be rounded using this amount.
Reset After specifies the time after which the user set value will revert to the "Reset to value" specified below. If this is Never (the default), the value won't reset.
Reset to value specifies the value the variable controlled by the numeric input will take on after the "Reset after" interval specified above (since the numeric input was set) is passed.
Show title, if checked, specifies that text should be displayed with the numeric input.
Wrap title, if checked, will wrap the title onto multiple lines in order to have more room for the input editing box.
Title specifies what text will be displayed if the "Show title" checkbox is checked. If left blank, the variable name will be used.
Title side specifies which side of the numeric input the text should be displayed on. This only matters if the check box for "Show title" is checked.
Specifies the width of the input editing box, with the label text taking up the remainder of the overall object. This is useful when placing labels on the left to make a sequence of numeric inputs placed vertically line up. Available only when Input expands to fit is not checked.
Input expands to fit, if checked, will automatically fit both the text and the input editing box into the overall object. If it is not checked, the value in Input Width will be used and the text aligned to the left of the overall object container (so there may be a space between the text and input box). If you specify a width that is too large to fit both the text and input box the value will be ignored.