Use a model view to display model structure as part of an interface page. Model views are created automatically for stories and will occupy the entire page. To add one to an interface page, use the Model view button ![]() on the Interface Build toolbar.
on the Interface Build toolbar.
During story telling, the visible content in the Model View is used to determine what variables and connections simulate. This information isn't used for regular interface pages, butyou can still specify what variable to show in the model view.
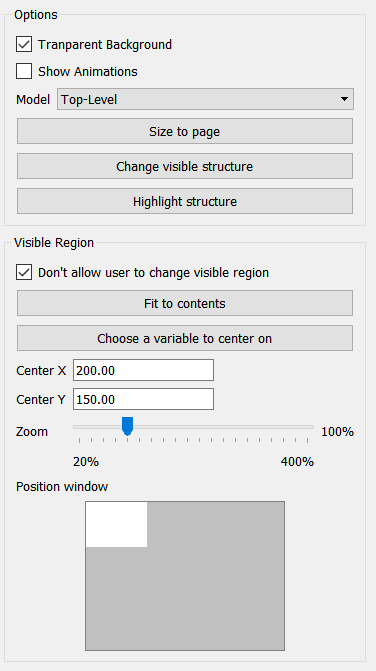
Transparent Background, if checked, keeps anything behind the model view visible instead of drawing the model structure against the specified (by default white) background color.
Show Animation, if checked, will display the small graphs directly on the variables the same way they are shown on the model window.
Model specifies which module you want to display content from. The default is Top-Level, but you can select any module from the list shown. If your model doesn't have modules, only Top-Level will be available.
Size to Page resizes the Model view so that it occupies the entire page. This is the only size available in stories, so this button isn't visible then.
Change visible structure lets you select which variables and connectors (as well as text boxes, tables and graphs) will be shown in the model view. Click on this to open the Setup visibility dialog.
Highlight structure lets you select which variables and connectors will be highlighted in the model view. Click on this to open the Setup highlights dialog. Only visible variables can be highlighted.
Typically, you won't want to display the full extent of the model in a model view, or you'll need to zoom to make the content visible in the available area.
Don't allow user to change visible region, if checked, means that the user will be able to see exactly what you do. If you uncheck this, and the model area is larger than the model view area, scroll bars will appear, allowing the user to scroll to different parts of the model. Generally, it works best to leave this button checked, but sometimes allowing scrolling is better than zooming out significantly.
Fit to contents will fit the entire visible contents of the model into the model view area and center it, zooming in or out as necessary.
Choose a variable to center on will reposition the diagram centered on the variable you choose.
Note If centering on the variable would cause the display of the model canvas beyond that containing any objects the position will be adjusted from the center.
Center X sets the horizontal position in the model that will be displayed at the center of the diagram. If you specify a value too small or too large (see note above) it will be adjusted.
Center Y sets the vertical position in the model that will be displayed at the center of the diagram. If you specify a value too small or too large (see note above) it will be adjusted.
Zoom lets you select a zoom level. Drag the scrollbar and let go at the zoom level you desire. The new zoom will be displayed in the model view when you let go of the mouse (not while you're dragging). Zooming maintains the center of the zoom until more of the model could be displayed by adjusting it as you zoom out.
The Position window shows you what area of the model is being displayed. The gray portion represents the entire model area, and the white portion represents what's being displayed. Drag the white box to change its position. If you position it at the upper left hand corner, the upper left hand corner of your model will be displayed. If you move the white rectangle down and to the right, you'll expose model structure there, which will make the visible structure seem to shift up and to the left (counter-intuitive behavior).
Using the Styles Tab ![]() , you can set the position, width, and height of the model view, and also whether it's locked. Locking of model views is often useful.
, you can set the position, width, and height of the model view, and also whether it's locked. Locking of model views is often useful.