Use the Model Settings Properties panel to set Run Specs and Page settings for the model (see Getting Started Online for differences in online editing).
To open the Model Settings, switch to Edit mode and click on an empty space in the model. (If you've closed the Properties panel, you'll need to double-click, or slide it out with the ![]() button appearing at the right of the application.)
button appearing at the right of the application.)
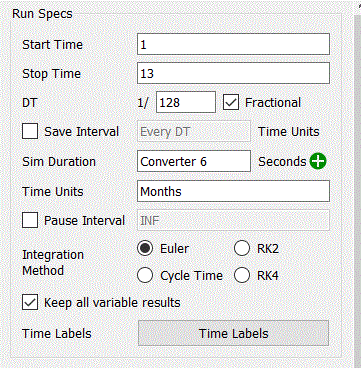
Use these boxes to specify the length of the simulation. The values you enter must be numerical.
The values you enter here depend on the Time Units you've chosen for the model. For example, if Time Units is set to Months and you want to run the simulation for a year (12 months), you'd specify 0 and 12 (or 1 and 13, if you prefer to report values Reporting values in tables) as the Start and Stop Time values. Or, if the unit of time is Years and you wanted to run the simulation from one specified year to another, you could type 1970 and 2010 as the Start and Stop Time values. If you wanted to run the simulation for 100 years, you could type 0 and 100 as the Start and Stop Time values.
The value in the "Stop Time" box has to be greater than the value in the "Start Time" box.
Note: If the value in the DT box isn't evenly divisible into the length of simulation specified by the Start and Stop Time values, Stella Professional chooses the closest multiple of DT for the simulation length.
This box specifies the Delta Time (simulation time step), either by specifying a value in the box, or by specifying DT as a fraction.
Regardless of the method you use, choose a DT small enough to let you capture the shortest time frame of interest in your model. The trade-off here is speed versus accuracy. The more calculations per unit of simulation time, the longer it takes to complete a given simulation. For more about DT, see Overview: DT.
Normally when a model is run values are stored every DT. This provides the complete trail of computation for Euler Integration and a trail sufficient to reconstitute flow values into the changes in stocks for all integration techniques. For large model with many DTs this can result in substantial memory and storage use. By specifying a save interval you can substantially decrease this burden. This is especially important for data collection (see Data Collection) where the data need to be sent across the internet.
Click on the Save Interval checkbox to specify a save interval and enter it into the editing box. The value must be a multiple of DT.
Enter a preferred Time Unit for model simulations in the Time Unit box. The unit of time you enter is used for display purposes and to compute units of measure for flows. It is also used as a basis for time labels (see Setting up Time Bounds) if you use units of time in a language other than English go to the Unit Editor dialog box and add your unit with the corresponding English time unit (for example, Months) as it equation.
Use this option to adjust the speed of the simulation by specifying how many seconds it should take to run the entire simulation. You can enter either a number, or a variable in the model that has a value to be used for the simulation duration. This can be a constant, or computed expression such as (STOPTIME - STARTTIME)/ speed where speed is the number of units of time computed each second. The specified duration variable, or speed in the example, can then be used with a slider or other input control on the interface. You can also have the duration increase during an interval of time or in response to certain conditions (e.g. IF Inventory < 10 THEN 20 ELSE 2 would slow down for low Inventory values).
Use ![]() to select the variable to use, or type in a number.
to select the variable to use, or type in a number.
By slowing the simulation down, you allow model users time to view changes in the model as a run unfolds. This is especially useful on the interface. Use 0 if you do not want to slow down the simulation.
Use this box to specify the length of time after which you want the model simulation to pause the run.
For example, if the Time Unit is Months and the length of the simulation is a year, but you want the simulation to pause every quarter, you would enter 3 as the pause interval.
To have the simulation run without pausing, clear the Pause Interval check box. The Pause Interval shows INF. This is the default setting for the pause interval.
When the Pause interval is set at a value less than the length of the simulation, the model simulation runs will pause like you've specified. You can then review values, change constants, and continue the simulation with the new values.
Select the integration method that you want to use for the run:
For more information about these integration methods, see Understanding integration methods. For more information about Cycle-time calculations and how time-stamping works, see Attribute and Cycle Time Tracking.
Select this check box to keep results for all variables in the model. If this check box isn't selected, only model variables that are assigned to output devices (like graphs or tables) will be recorded. This option is highly recommended, except for very large models that run for a very long time and would consume too much memory.
If you select this check box, a small graph will appear inside each stock or flow when the simulation is run, and the results for each variable will be available on the Results panel.
Click on Time Labels to open the Manage Time Labels dialog box. This will allow you to set up and customize the labels that will be used for time in tables and graphs including setting up date formats.
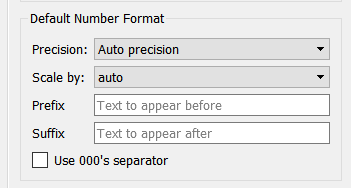
You can set the default number format that will be used when displaying variables. This will be used for variables that have not had a number format set explicitly from the Scales and Ranges Tab.