
Stella® Professional makes it even easier to build, share and learn from your models. Here are some of the things that are new in Stella Professional.
With Stella Professional, you now have more flexibility and control over appearance, using the same set of building blocks you've always used. Stella Professional supports you step-by-step while maintaining the integrity of the models you build. You'll also find powerful new ways to work with and understand your models.
For previous users, Stella Professional is both familiar and new.
The first thing you'll notice is a new set of toolbars.
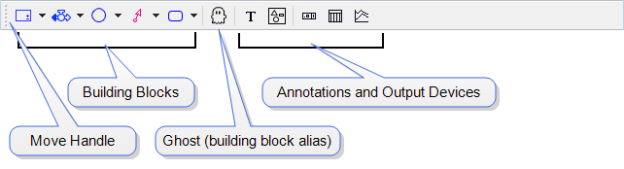
The Build Toolbar contains the same components as previous versions, with slightly different icons. By default, it's in the same location.
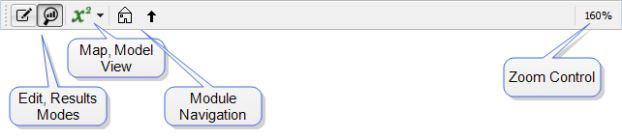
The Mode toolbar can be used to switch between Edit mode to make changes to your models and Results mode to look at model behavior. It is allows you to navigate modules, control zoom and switch between the mapping and modeling views of structure.

The Run toolbar lets you start pause and start runs. You can also slide through the current run to view results at different times.
All toolbars are movable and can be docked on any side of the window. By default, the Build and Mode toolbars are at the top, and the Run toolbar is at the bottom.
If you grab the handle at the left end of a toolbar, you can put the toolbar in a new location along one of the other edges, or leave it floating.
Building is done in a very similar way to previous versions. Click a building block, then click somewhere in the Stella window to drop it in.
The new look is more refined, compared to the classic Stella appearance:
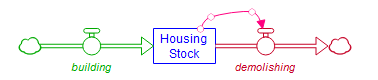
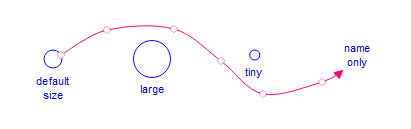
You now have much more control over appearance. You can set fonts, colors, and other attributes. For example, you can change the font on flows, mark a converter as Name Only, resize stocks, and use Bezier connectors:
You can set properties for all model objects from the Properties panel:
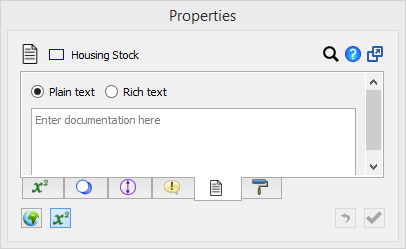
Use the Properties panel to create documentation, enter equations, set styles, and adjust many other attributes of virtually all model objects or the model itself. You can set properties for multiple objects at the same time. The set of tabs available depends on what's selected.
By default, the Properties panel is docked at the right. You can un-dock it to make it a floating window.
In addition to fonts and colors, now you can set the size on stocks and converters and set specific Converters to be name-only. This, combined with bendable Bezier connecters, allows a lot more flexibility in presentation.
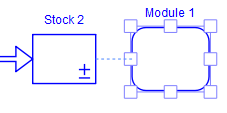
It's easier to lay things out with object guides. These appear as you move objects around the window, any time one object aligns with another. For example, when you move "Module 1" next to "Stock 2", a guide line appears:
Stella Professional keeps a running tally of your changes so if you make mistakes, or change your mind, you can undo the changes you've made. Models are autosaved to let you recover them if something goes wrong, so you never lose more than a few minutes' work.
One of the most exciting new features in Stella is the ability to explore model behavior using Stella Live. In Explore mode, you can change constants in the model by dialing them up or down, and you'll immediately see the results for building blocks, graphs, and tables displayed right on the diagram.
Enter Explore mode ![]() by running the model from the Run toolbar or menu, or select Explore from the Mode toolbar. In this mode, graphs appear on all the objects that have results available. To view larger graphs, including full axis labeling, open the Results panel and click an object containing a graph. This lets you easily walk through a model with the mouse, looking at results. Open the Results panel from the Model menu, or right-click an object and choose View Results.
by running the model from the Run toolbar or menu, or select Explore from the Mode toolbar. In this mode, graphs appear on all the objects that have results available. To view larger graphs, including full axis labeling, open the Results panel and click an object containing a graph. This lets you easily walk through a model with the mouse, looking at results. Open the Results panel from the Model menu, or right-click an object and choose View Results.
You can change constants by dragging the mouse around the knobs  . As you spin the knobs, the model will simulate with the new input value and you'll immediately see the results for everything, right on the diagram. You can also change values in the Results panel.
To get back to Edit mode ![]() , double-click any building block in Explore mode. All appropriate tabs will appear for the selected object.
, double-click any building block in Explore mode. All appropriate tabs will appear for the selected object.
The Results panel shows comparative graphs on-the-fly.
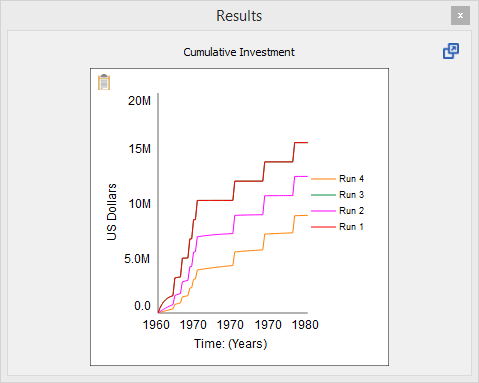
You can define and place graphs and tables in the model with these added capabilities:
Comparative tables and graphs now work with the Data Manager.
- Any runs held by the Data Manager are displayed in comparative graphs and tables as soon as you specify the variable. You don't need to run the model again to see the results when you change a variable.
- If you've specified that 5 runs should be saved in the Data Manager, the oldest run will fall off of comparatives when you make a sixth run.
- During a Sensitivity run, comparative graphs and tables show the results for all of the Sensitivity runs, but once you make another run, they'll revert to only showing the runs stored by the Data Manager (which may be a smaller number of runs).
- Now you can lock individual runs in graphs and tables. You can do this on the Property panel for the graph, or for all comparatives by right-clicking and accepting the list of Displayed Runs other than Next Run.
The Map and Model layers from previous versions of Stella and iThink have been replaced by views in the same window:
Choose these views from the from the Mode toolbar or the bottom of the panel.
The validity mechanism evaluates equations and units for validity and dimensional consistency.
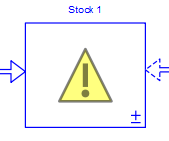
In Model view, any unfinished or invalid building blocks are marked with a small caution sign.
There's also a list of all the issues available on the Run toolbar:
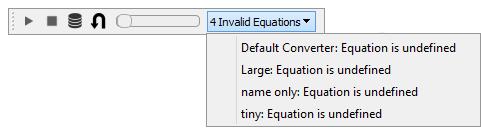
Choose any one of the error messages to highlight the invalid object. This will take you directly to the equation, even when the error is in a different module.
Once all the equations are valid, the model will automatically be checked for dimensional consistency. Any issues with units will appear in the Run toolbar; choose an error to get directed to its context. When you've resolved all the issues, the validity indicators will disappear.