A group input provides a mechanism for the interface user to input a series of values by typing them in. The values appear as cells in a table where the numbers are typed in. This type of input isn't strongly interactive, but it can be useful when you want the user to populate basic information that might be used in the simulation, and not choices or decisions the user is making.
Like any input, the values entered will override the values in the underlying model equation. If the model equation is a constant, the value of the constant will be displayed for editing. If the model equation isn't a constant, a blank entry will be displayed for editing. Entering a value will then override that model equation. Erasing the value entered there will return the model to using the original equation.
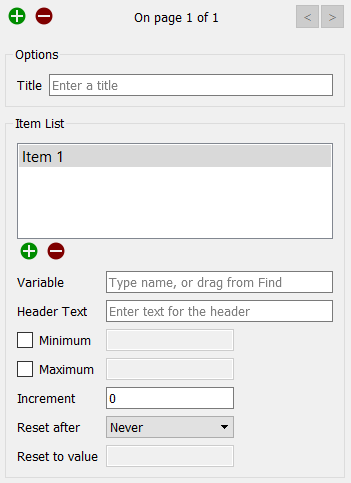
You can have multiple pages on a group input, but you should make sure to let your audience know if you do, because the interface user is likely to overlook that possibility. Each page has its own title and entries. Use the ![]() button to add a page and the
button to add a page and the ![]() button to remove the current page.
button to remove the current page.
Title specifies the title that will appear at the top of the list of inputs for the current page. Each page has its own title.
Lists the variables that can be changed by the interface user. Use the ![]() to add to the list (the Find window dialogue will come up, and you can click on a variable to choose it). Click on an entry in the list to edit it, or delete it using the
to add to the list (the Find window dialogue will come up, and you can click on a variable to choose it). Click on an entry in the list to edit it, or delete it using the ![]() button.
button.
Variable specifies the model variable to be set. If the variable is arrayed, this must be an element of the array. If you type here, autocomplete will offer suggestions.
Header Text specifies the text that will appear to the left of the value. If left blank, the name of the variable will be used here. You can use a space to show an empty line.
Minimum, if checked, specifies the minimum value that can be set. If the interface user types in something smaller than this, the minimum value will be used instead (and the text updated so the user can see it).
Maximum, if checked, specifies the maximum value that can be set. If the interface user types in something larger than this, the maximum value will be used instead (and the text updated so the user can see it).
Increment, if specified, controls the granularity with which the input can change. If the user types in something at greater granularity, it will be rounded when the user finishes editing. For example, if Increment is set to 10 and the user types in 29.57, 30 will be used (and displayed after they exit editing).
Reset After determines whether the value entered by the user will be reset to a specified value or simply left at the value set by the user during the remainder of the simulation.
Reset to value specifies the value to reset the input to. It's only used (and not grayed) when Reset After isn't set to Never. Typically, this is the same as the model equation, but it doesn't have to be. The reset value will be displayed when the reset occurs.
Note: If you use a reset value on a variable that's not a constant, then the reset value, and not the original equation, will be used. To revert to the original equation, the user must clear the editing field or restore inputs.
Set styles using the Styles ![]() tab as described in Styles Tab (Interface). In addition to position and size, you can specify the background color and, separately, the fonts for text and header text.
tab as described in Styles Tab (Interface). In addition to position and size, you can specify the background color and, separately, the fonts for text and header text.
Note that styles (except size and position) can be different on each page, and the styles tab allows you to navigate through, and also add and delete, pages.