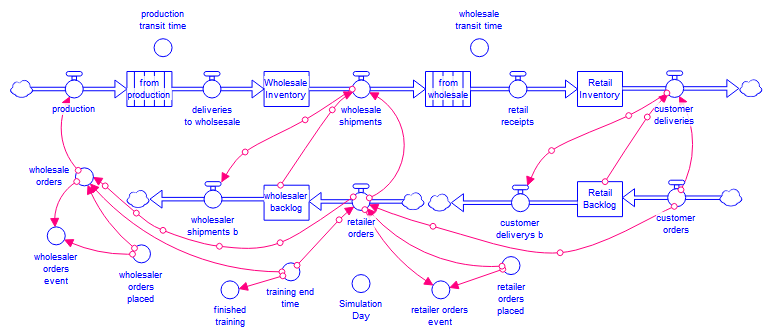
In this tutorial, we'll build a cooperative multiplayer game, involving order decisions made by a retailer and wholesaler in a simple supply chain. The model itself is quite simple, but has some added complexity to manage a training period, during which each player is required to make a prespecified decision.
It's worthy of note that there is no feedback from inventory to ordering in this model. Ordering, in fact, is simply a constant, as this will be the decision made during the game. A consequence of this is that simulating the current model does not generate interesting behavior.
Adding ordering rules for the retailer and wholesaler would not change the game behavior of this model at all. This is because the same decisions could be made. With rules, they would override a formulation instead of a constant, but the end effect would be the same.
You can get this model from the isee Exchange. Download it, and open it in Stella.
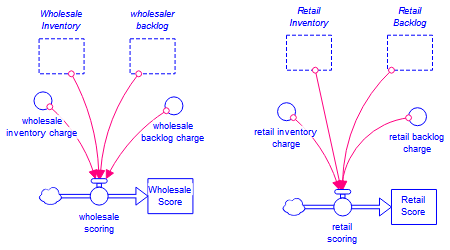
Working through this tutorial, you'll set up a game with a Retailer and a Wholesaler. Each has the goal of minimizing their own inventory while fulfilling all orders. To make it more like a typical game, we also include a small scoring section in the model:
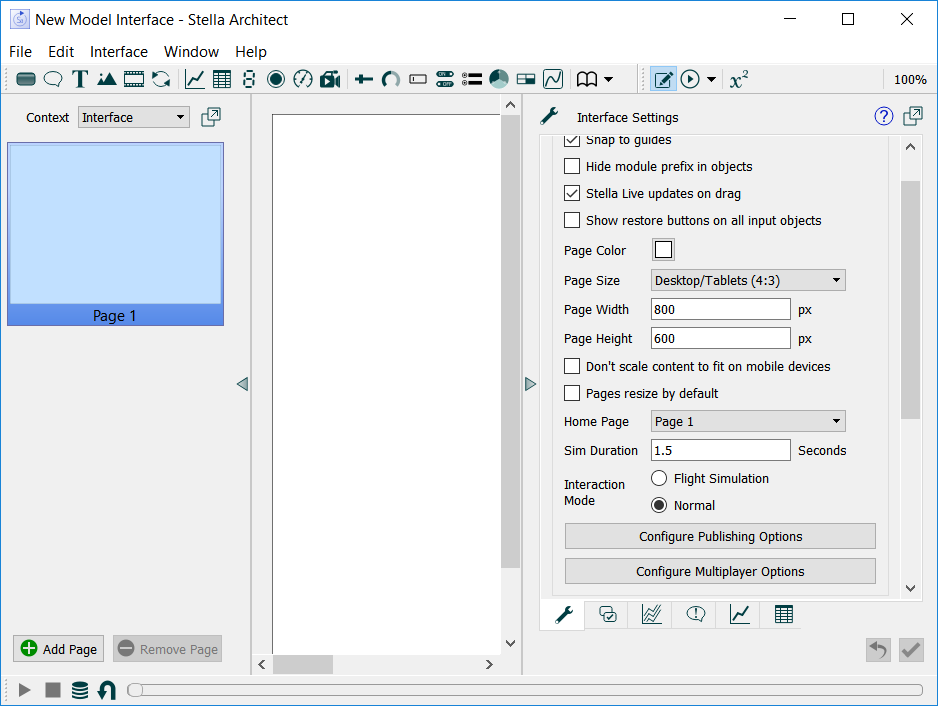
Open Stella Architect or Stella Designer
If you have Stella Designer, start it, then download and open the model to view it (you won't be able to build the model using Stella Designer). If you have Stella Architect, and are in the model window, go to the interface window (select Open Interface Window from the Window menu, or click on ![]() in the Mode toolbar).
in the Mode toolbar).
You should see an empty page, with an empty thumbnail to the left:
Create the Intro Page
For multiplayer games, you can either create a different initial (landing) page for each role, or create one and then navigate away to different pages based on role. In both cases, the players eventually end up on pages specific to their roles, it's just a question of flow.
For this model, because we'll want to use simulation events on the training pages, we send everyone to an intro page, then navigate them to the training pages. This will allow us to make one step in the model with the decisions at their nominal value, and then let the players make decisions. Simulation events, which are based on changes in values, can then be used to indicate that there's an issue with a decision during the training period.
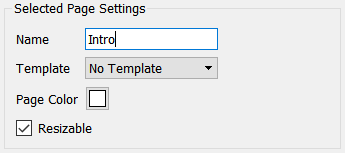
In the Interface Settings Properties Panel at the right, give the page the name Intro.
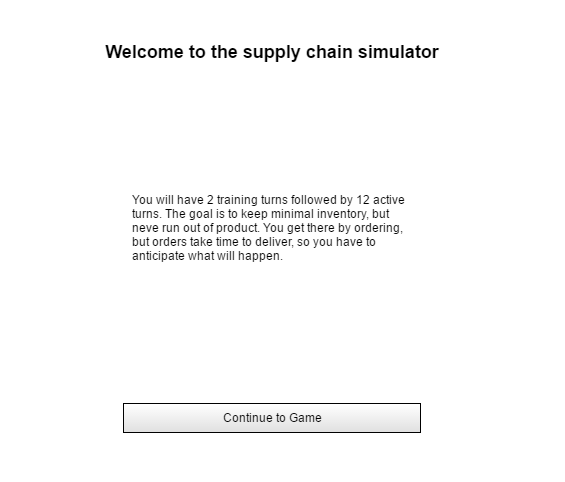
Add a text box at the top of the empty page by clicking on ![]() in the top toolbar, clicking on the empty page, and then typing "Welcome to the supply chain simulator". Change this to a bigger font by clicking on
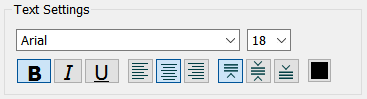
in the top toolbar, clicking on the empty page, and then typing "Welcome to the supply chain simulator". Change this to a bigger font by clicking on ![]() at the bottom of the properties panel at the right and selecting an 18 point font size, click on B for bold, and click on centered (
at the bottom of the properties panel at the right and selecting an 18 point font size, click on B for bold, and click on centered ( ).
).
Then, click back on the ![]() at the bottom of the properties panel to return to the regular object settings.
at the bottom of the properties panel to return to the regular object settings.
You may want to resize the text box if the content doesn't fit easily.
Add another text box with game instructions (see below for the text).
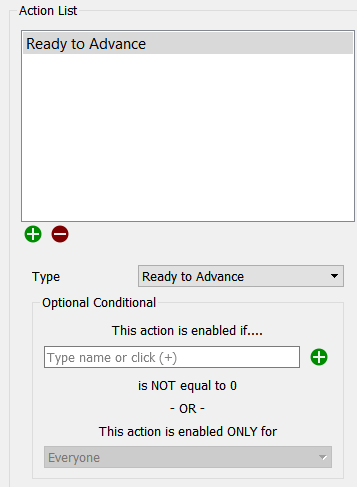
Add a button by clicking on ![]() in the toolbar, and dropping it bottom center. Add the action Ready to Advance to the button:
in the toolbar, and dropping it bottom center. Add the action Ready to Advance to the button:
Advance:
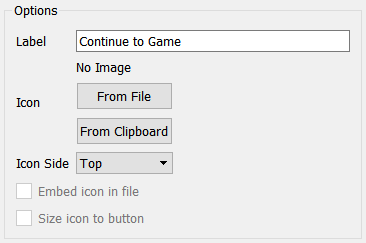
Give the button the label "Continue to Game."
Your page should look something like:
Create a Retailer Template
There will be two input screens for the retailer, one for a training period, and one for the game proper. The two are almost identical, so it's easiest to set up a template for them.
In the pages panel on the left, select Template from the dropdown labeled Context:

The page should be blank.
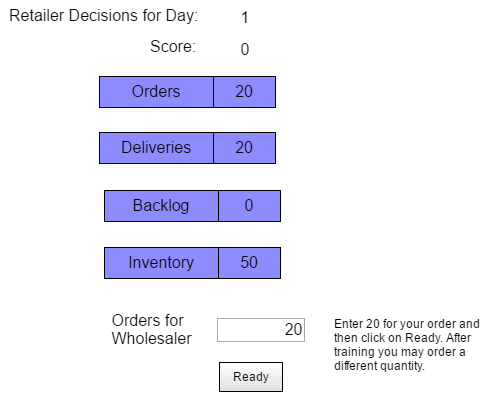
To this page, add a text box at the top by clicking on ![]() in the top toolbar, clicking on the empty page, and then typing "Retailer Decisions for Day:". Just to the right of this, add a numeric display, by clicking on
in the top toolbar, clicking on the empty page, and then typing "Retailer Decisions for Day:". Just to the right of this, add a numeric display, by clicking on ![]() in the toolbar and clicking to the right of the text box. Then, in the panel, uncheck Show Title and click on
in the toolbar and clicking to the right of the text box. Then, in the panel, uncheck Show Title and click on ![]() to select Simulation Day:
to select Simulation Day:
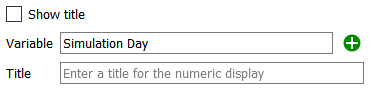
Just below this, repeat this operation with the text box reading Score, and the variable for the numeric display Retail Score.
Now, add numeric displays with titles for customer orders, customer deliveries, Retail Backlog, and Retail Inventory. Leave the Show title checkbox checked, but type in the shortened names Orders, Deliveries, Backlog, and Inventory in the Title field. (Click on ![]() in the toolbar, then click below that last object). Click on
in the toolbar, then click below that last object). Click on ![]() to select the variable.
to select the variable.

Now, add a numeric input, by clicking on ![]() in the title back, and clicking below the last numeric display. Use the
in the title back, and clicking below the last numeric display. Use the ![]() button to add retailer orders placed, and give it the title Orders for Wholesaler.
button to add retailer orders placed, and give it the title Orders for Wholesaler.
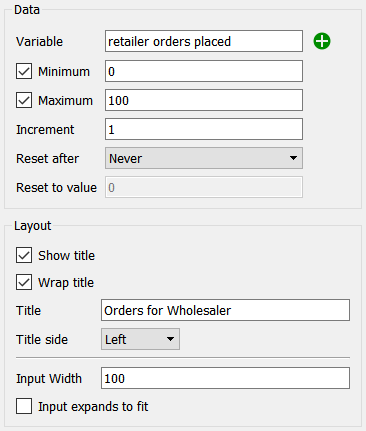
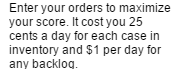
Set a minimum of 0 and a maximum of 100 with an Increment of 1, as shown.
Finally, add a Ready button by clicking on ![]() in the toolbar, clicking at the bottom, and selecting the action Ready to Advance:
in the toolbar, clicking at the bottom, and selecting the action Ready to Advance:
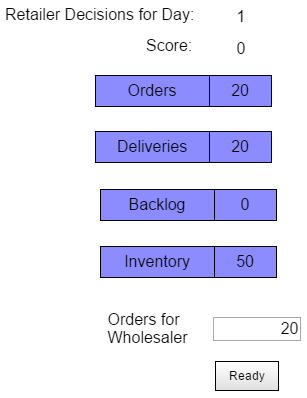
The page should look like:
Click on an empty part of the page. In the panel, name this template Retailer:

Note: If you want to test resizing of the template, check the Resizable button. The interface page settings for resizable override this setting, so it doesn't matter if it's checked.
Create Retailer Interface Pages
The template page that we created captures the entirety of the interface for the retailer, except the instructions for proceeding.
In the pages panel at the left, select Interface from the dropdown on the top:

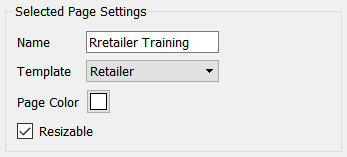
Now, at the bottom, click on  . In the properties panel, name the page Retailer Training, and tell it to use the template Retailer:
Also click on resizable (we'll use the default resizing options, which work fine for this interface).
Now, click on the ![]() in the top toolbar, and add the text telling the user to enter 20. You should have something like this:
in the top toolbar, and add the text telling the user to enter 20. You should have something like this:
The Retailer Game page is created the same way. Add a new page, select the retailer template, then add a text box. This time, the text box should read:
Create Wholesales Template and Pages
First, use copy and paste to create a wholesaler template.
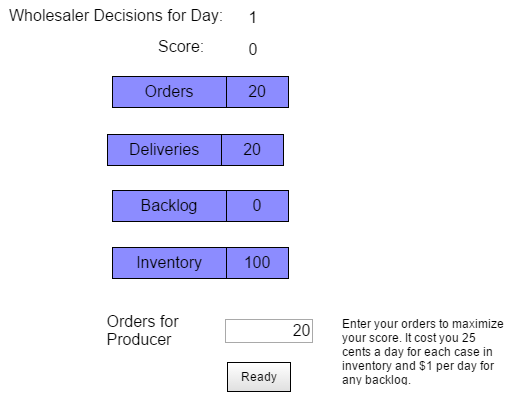
In the template page, right click on the Retailer template and select copy, then right click and select paste. A copy of the retailer template will appear. Then, just change the variable names (and template name). This will also give you the same layout for both players.
Simulation Day does not change
Retailer Score ---> Wholesaler Score
customer orders ---> retailer orders
customer deliveries ---> wholesale shipments
Retail Backlog ---> Wholesale Backlog
Retail Inventory ---> Wholesale Inventory
retailer orders placed ---> wholesaler orders placed
Replace retailer in the labels with wholesaler in the top label, and Wholesaler with Producer in the bottom label. You may need to adjust text box sizes to maintain a good appearance.
Copy and paste can also be used on the interface pages, or you can use at the bottom, and just fill the contents in as you did for the retailer pages.
If you copy and paste, you'll need to set the template to Wholesaler (be careful to check, as the two templates look identical except for Inventory). Your Wholesaler Game page should look like:
Add a Debrief Page
We'll use a common debrief page for both the retailer and wholesaler, showing a graph of orders, backlogs, and inventory.
Make sure the context is Interface, at the top of the pages panel on the left.
Add a new page using the button at the bottom. Name the page debrief.
Add two text boxes to describe the page (see screen shot below for their location and content).
Add a graph, and select Tabs as the paging type, then click ![]() twice so there are three pages on the graph (
twice so there are three pages on the graph ( ).
).
You can move between the tabs using the < and > buttons shown above. On the first tab, add customer orders, retailer orders, and wholesaler orders, naming the table Orders. On the second, add retail backlog and wholesale backlog, naming the graph Backlogs. On the third, add retail inventory and wholesale inventory, naming the graph Inventories.
Your debrief page should look like:

Set Up Roles
It's now time to tell Stella that we want a multiplayer game. Click on a blank part of an interface or template page to get to the interface panel.
Click on the button Configure Multiplayer Options, showing in the panel. A dialog will open:
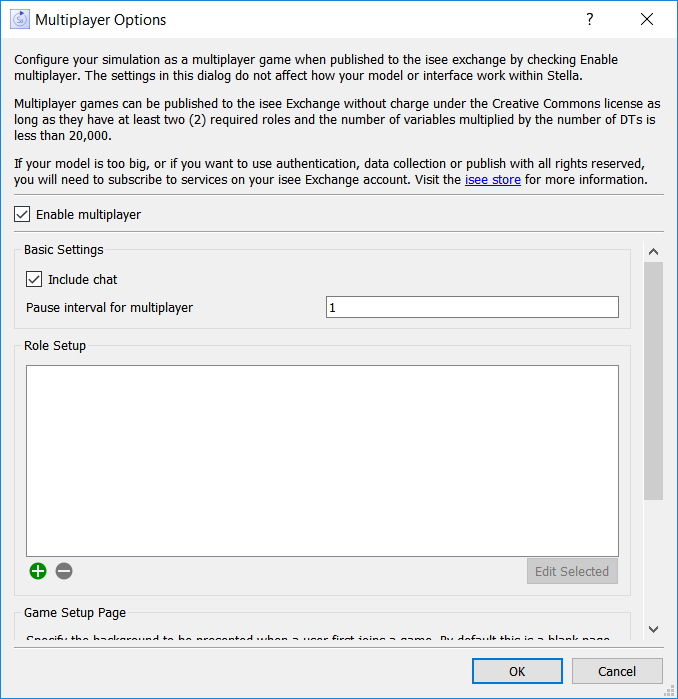
Check the Enable Multiplayer checkbox, then click on the ![]() under Role Setup. Add the retailer role in the dialog that appears:
under Role Setup. Add the retailer role in the dialog that appears:
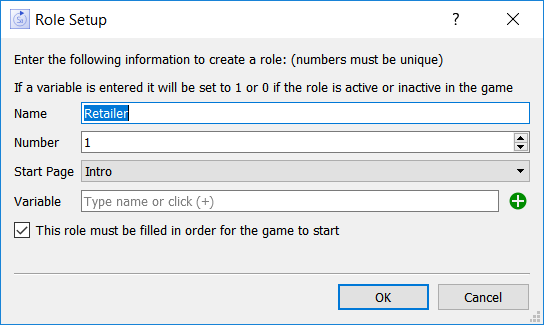
Give it the name Retailer, make the start screen Intro, and click OK.
Click ![]() again, and add the wholesaler. Give it the name Wholesaler, again make the start screen Intro, and click OK.
again, and add the wholesaler. Give it the name Wholesaler, again make the start screen Intro, and click OK.
Change Intro Page to Conditionally Navigate
Go back to the Intro Page and click on the button at the bottom. Under actions, click on ![]() , select Navigate to Page, and select the page Retailer Training. Now, under "This action is enabled ONLY for", select Retailer.
, select Navigate to Page, and select the page Retailer Training. Now, under "This action is enabled ONLY for", select Retailer.
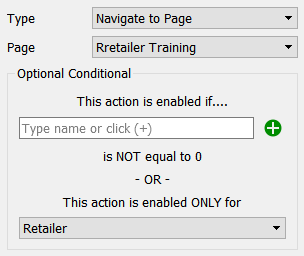
Repeat this operation with Wholesaler Training and Wholesaler selected.
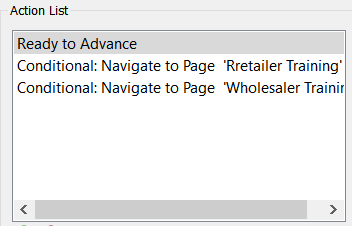
We've created two mutually exclusive conditionals, and this will cause the retailer role to go to the retailer training page, and the wholesaler role to navigate to the wholesaler training page. Your actions list should now appear as:
Create Message for Training
The base model has simulation events to remind people to follow the rules during training, and to mark the end of the simulation. In the model you downloaded, the training rule events will go to both players, which would be confusing. If the retailer didn't follow directions, we want to send a message to the retailer, not the wholesaler. Similarly, if the wholesaler didn't follow directions, we want to send a message to the wholesaler, not the retailer.
Click on a blank part of the page (or template), and then click on the ![]() tab at the bottom of the panel on the right. You should see a list of 5 events:
tab at the bottom of the panel on the right. You should see a list of 5 events:
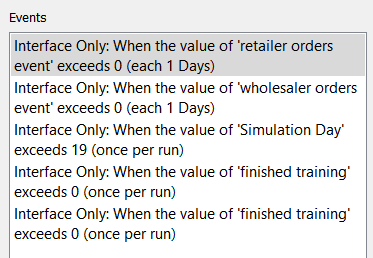
Click on the first (retailer orders event), and click on Edit Selected. In the dialog that appears, click on Edit Action in the lower right. The simulation event action dialog will appear:
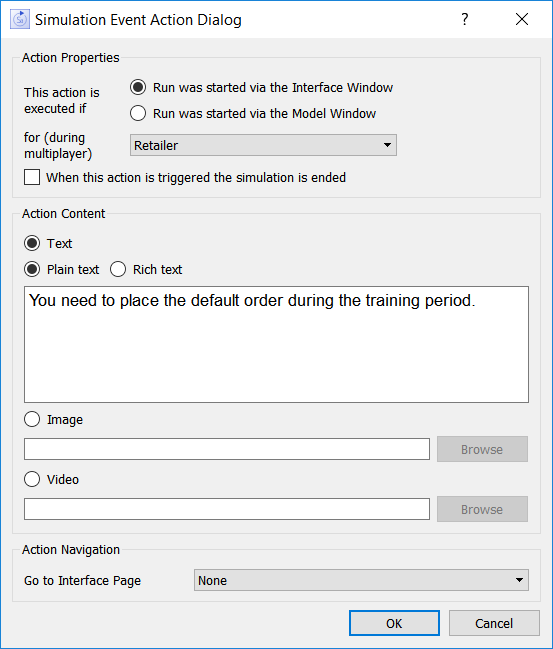
In the dropdown labeled for (during multiplayer), select retailer.
Repeat the above steps for the wholesaler event.
Add Navigation to Game Page
You set up a training page and a game page for both the retailer and the wholesaler. We want to change to those game pages when training is finished.
There are two simulation events in the model related to finished training. They're actually identical; the only reason there are two is that we want two actions, one for the retailer and one for the wholesaler, and we want them to happen at the same time.
Click on the first finished training action (probably fourth in the list of events), and click on Edit Selected. In the dialog that opens, click on Add Action. The Simulation Event Action dialog will open.
Select Run was started, via the Interface Window.
In the dropdown below this, select Retailer.
At the bottom, in the Go to Interface Page dropdown, select Retailer game.
Leave the message blank (blank messages do not display).
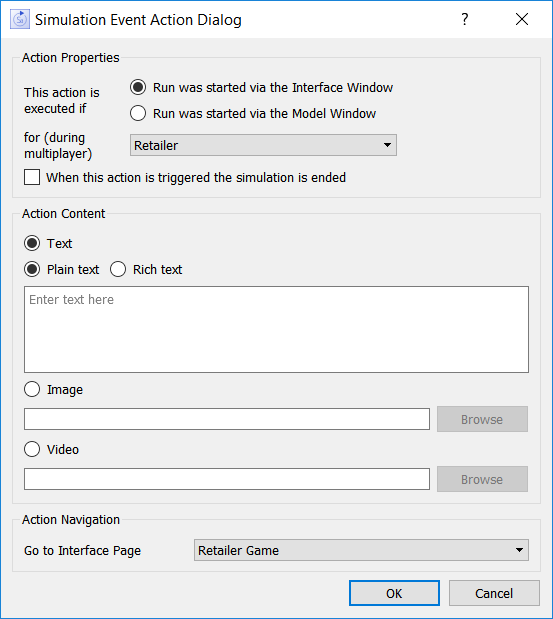
Click OK.
Now repeat this for the wholesaler, starting from the second training finished event, and specifying that the action is for Wholesaler, and the navigation is to Wholesaler Game.
Note: Don't add a second action to the simulation event you just edited. Each simulation event should only have a single action.
Be careful to match these action and navigation destinations. If you send the wholesaler role to the retailer game, the results will be surprising, but not in a good way.
Go to Debriefing when the Game is Over
The model is set to run from time 0 to 15 with time 0, 1, and 2 for training. After people have played the game, they should get a chance to see what happened, thus the simple Debrief page we created earlier.
We want to send both roles to the Debrief page. We use the event for Simulation Day (included in the starting model) to do this. This is just like the previous step, except this action will apply to everyone.
Click on the first finished training action (probably fourth in the list of events), and click on Edit Selected. In the dialog that opens, click on Add Action. The Simulation Event Action dialog will open.
Select Run was started, via the Interface Window.
Leave the dropdown below this as is (Everyone).
At the bottom, in the Go to Interface Page dropdown, select Debrief.
Leave the message blank (blank messages do not display).
Congratulations - your interface is complete!
Publish
Select Publish from the File menu. Log in, create a new Sim, and publish your model (see Publishing to the isee Exchange for more discussion).
Play
Connect to your published game in your favorite browser. To play it by yourself, you'll need two tabs open to the same location.
Note: You don't need to log in to play a game. If you're logged in, you won't be asked for a name.
If you're not logged in, you'll be asked for a nickname:
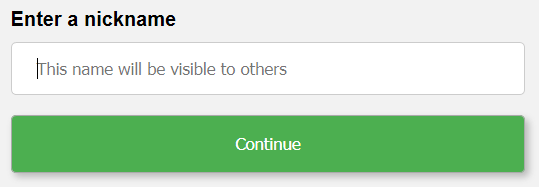
Enter one, and click continue. You'll get a dialog offering to start or join a game:

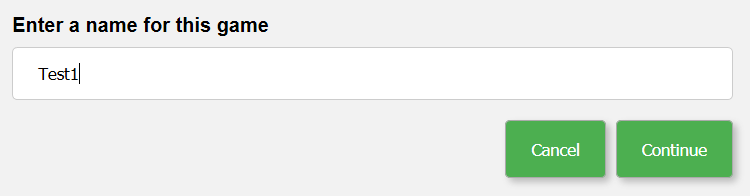
Create a new game:
You'll be put into the waiting room for the game:
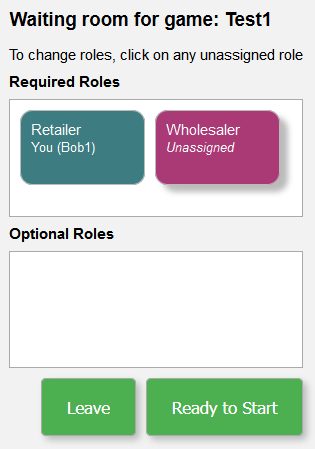
Click on Ready to Start - wait for the Wholesaler.
In another tab or browser window, go to the same URL, and enter a name and click continue:
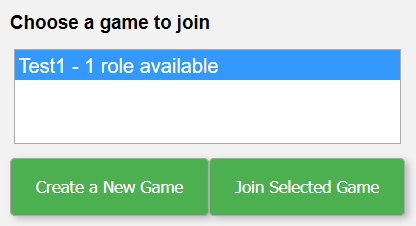
This time, click on Join Selected Game. Then, click on Ready to Start, and both players should be in.
Now play the game the way we designed it.