Publishing your interface allows you to give access to the work you've done, without requiring your viewers to have or install any special software. Your interface will be available at the isee Exchange, and the only thing needed to access your published interface is an internet connection and a modern web browser.
By modern web browser, we mean a recent version of any of several popular browsers, including Chrome, Firefox, Edge, Safari, and Internet Explorer. The browsers need to have a significant degree of support for html5, the new standard for delivering web content. Chrome will work best. Versions of Internet Explorer prior to version 10 won't work well. (For the major browsers, the minimum version requirements are IE 11+, Edge any, Firefox 31+, Opera 27+, Safari 7+, and Chrome 37+.)
Publishing is very straightforward: just select Publish from the File menu. This will open up a web browser on the isee systems publication site. Sign up using your email as a login, or sign in if you've already signed up. Then you can publish your interface to a location you've already set up, or create a new place to publish. After that, anyone can run your model by pointing their web browser at the location you specify.
Note There is a limit to the size of the published file of 15 megabytes. If you exceed this you will get an error message. You can substantially decrease size by publishing without any runs (use restore all devices before publishing).
When you publish an interface and the user navigates to the web page, all of the intensive interaction related to using the interface, most especially running the model, occurs in-browser. This means that latency and slow internet connections won't affect the experience of the interface user. (For very large models, there's an alternative approach where the model is run on a server.)
Select publish from the File menu. The Publishing Dialog (Interface), really a web browser window, will open. You can sign up, if necessary, then publish to an existing simulation or add a new one.
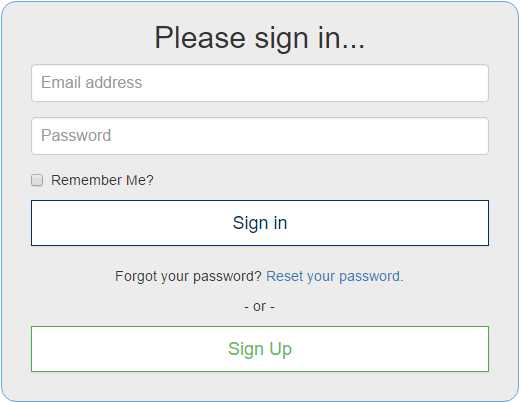
The publish dialog will initially open on the sign in page with an area to sign in:
Enter your email and password to sign in (the isee Exchange will remember that you're signed in for a period of time, so you won't always see this).
If you're signing in for the first time, you'll need to sign up first. Click the signup link at the bottom of the sign in area to do this.
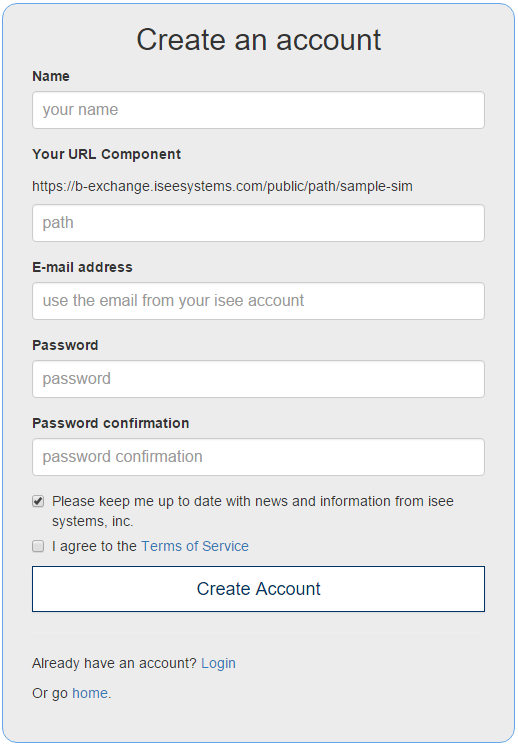
Enter your name and email address, and a password with confirmation. The credentials maintained by the isee Exchange are currently independent of the sign-in information held at the isee systems web site. Nonetheless, we recommend that you use the same email address as you use to sign into your account on at iseesystems.com.
All interfaces published to the isee Exchange are organized by author, and then by the name of the simulation. You can choose both of these, though there are some restrictions. Selecting first-last for the URL component is common (all URLs are lower case, and only allow -; no spaces or _ can be added to them). For example, if you chose gloria-adams as your URL component and named your simulation drought, the web address that people would use to access your interface would be https://exchange.iseesystems.com/public/gloria-adams/drought.
Leave this box checked if you want to periodically receive emails regarding isee systems, inc. products and services. If you uncheck this box you will not receive any of our broadcast emails. You should uncheck this box if you are under 18 years of age.
isee systems is hosting your published interfaces in order to share the insights, learning, and enjoyment they'll bring to anyone using them. All such publication is subject to terms of service outlined on our website.
Models are published under a creative commons license that allows only non-commercial use, requires attribution, and does not permit derivative work (http://creativecommons.org/licenses/by-nc-nd/4.0/).
Your published interface is referred to as a simulation (or simply sim) on the isee Exchange. You can add as many as you like, but typically you'll publish updates of the same model to the same name (and you can also rename simulations if you decide to).
To creation a simulation, click on the Add New Simulation button.

This will bring you to a location to add information to the simulation:
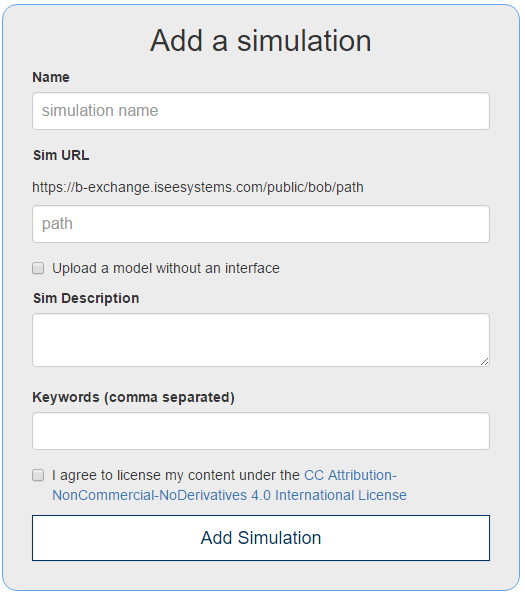
Give the simulation a name; this will be used in providing information about it, and creating a Sim URL as described above.
Upload a model without an interface, if checked, will prompt you for the source model to upload (see Sharing Models Online). If not checked, you'll be simply seeing an upload button and this will automatically upload your interface.
Note: You can upload an interface afterward even if this is checked, and you can upload a source model afterward if it's not checked.
This describes the sim. There is no limit on size, but 50 to 150 words is recommended. When users are looking over simulations, this will be what they look at to decide whether to investigate published work.
These will help users with searches. Enter a comma delimited list, including as many as apply. Keywords should be those common in the area of application of the simulation (for example, if the model is related to drought, drought would be a keyword, but you might also include evaporation).
Once you've added a simulation, you can update and change it from your Sims list anytime.

View will open your simulation so you can see how it looks and behaves when published.
Update Interface will publish the interface you had when you selected Publish from the File menu.
Info will give you information about your simulation.
Edit will let you edit the sim information as you input it in the add simulation step. This will also allow you to upload a model that users can download.
Delete will delete your simulation.
Every sim you publish is automatically added to the public directory, displayed at the home page of the isee Exchange. Models with significant descriptions, keywords, and usage will be displayed in the main directory, and all your sims will be displayed in your author directory (exchange.iseesystems.com/your-url).
You can include your simulation in another web page by embedding it in an iframe. To do this, add, inside the <body> section of your web page, the html code:
<iframe style="width:860px; height:680px" src="https://exchange.iseesystems.com/public/your-name/your-sim">
<p>Your browser does not support iframes.</p>
</iframe>
Base the width and height on the size of your interface page - 860x680 works well for a 800x600 interface page size. If you make it too small, there will be scroll bars. If you make it too big, there will be unused space. Additional styling can be added as desired.
Note that the link to the sim is https. If you use http, it will redirect to https anyway. All connections on the isee Exchange are done over SSL to ensure integrity of the data passed back and forth.
If you want to make the model that you published your sim from available to others, or customize the picture displayed in the directory, click on the Edit button for the sim in your isee Exchange account.
This will open the sim editor. In addition to the basic information about the sim, you can also upload a source model or set the thumbnail.
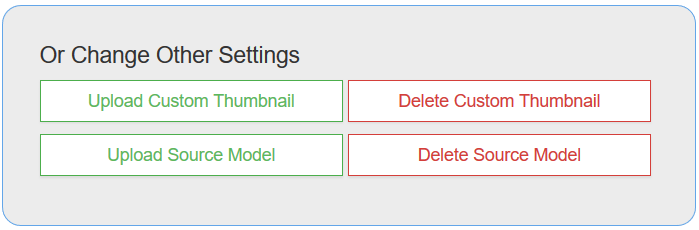
The source model should be just the model (.stmx or.itmx file) or an archive of (.zip) file with the model and supporting material. The thumbnail should be a jpg or png file.
Uploading a file will overwrite anything you have previously uploaded.
You can also delete anything you have uploaded. If you do this the source model will no longer be available. Deleting the thumbnail will cause the home page of the simulation to be used for the thumbnail.