Use the Properties Panel for Graphics to select the formatting options for a Graphics box.
To open the panel, select the graphics box in Edit mode, or double-click on the graphics box in Explore or Experiment mode.
This lets you specify the content of the graphics box, how it will appear, and how it will be saved.
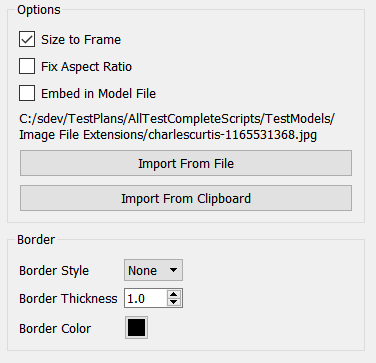
Size to Frame, if checked, will resize the graphic to be the same size as the containing box. If this isn't checked, the graphic will be displayed at its original size, centered in the outlining frame.
Fix Aspect Ratio, if checked, will maintain the original aspect ratio for the image. This will cause blank space to appear along either the bottom or the two sides if the frame and image do not have the same relative width and height. This option is available only on the interface.
Embed in Model File, if checked, will store the graphic inside of the model file when you save the model. If you import the graphic from the clipboard, this option will be checked and grayed. If you import the graphic from a file, and leave this option unchecked, the original graphic file will be used each time the model is opened.
Important large graphics files (more than about 500 kilobytes) should not be embedded in the model as they will slow overall performance, especially on the interface.
C:\.... If you have selected a file the location and name of the file will be shown.
Tip: If you keep the original file, putting it in a subfolder called Graphics located in the same folder as the model will make it easier for others to open your model with the graphics intact.
Import from File brings up a file selection dialog to choose the graphic you want to display. Valid formats are .png, .jpg, .jpeg, .bmp, and .gif.
Import from Clipboard brings the image contents of the clipboard into the graphics box. There must be a raster image on the clipboard. If no suitable clipboard format is found, a message will be displayed. You need to place the image on the clipboard from another application that supports raster images.
This lets you specify the border that will appear around the image being displayed.
Border Style can be either Solid or None. If you select None, the remaining settings won't matter.
Tip: When you first place a graphic on the model, it will have no border and no content and will, therefore, be invisible if it's not selected. Use Select All from the Edit menu if you lose a graphic.
Border Thickness lets you specify how thick, in points, you want the border around the Graphics box to be. This has an effect only when you've selected Solid for the Border Style.
Border Color lets you specify the color for the border. Click on the displayed color button to select a color. This has an effect only when you've selected Solid for the Border Style.
For more information about adding pictures to models, see Graphics box.
Note: For a list of supported image file formats, see Supported graphic file formats.