The array input is a specialization of the Group Input (Interface)designed to work with arrays. It provides a mechanism for the interface user to input all values from an array by typing them in. The values appear as cells in a table where the numbers are typed in. It is possible to specify arrays of any dimension for this input. For arrays with more than 2 dimensions there will be a number of pages automatically created for the input.
Like any input, the values entered will override the values in the underlying model equation. If the model equation is a constant, the value of the constant will be displayed for editing. If the model equation isn't a constant, a blank entry will be displayed for editing. Entering a value will then override that model equation. Erasing the value entered there will return the model to using the original equation.
Select Array Input ![]() from the Interface Build toolbar, and click on the page at the location you want it to appear. After placing it, you can size it by dragging its sizing handles or using the Properties panel.
from the Interface Build toolbar, and click on the page at the location you want it to appear. After placing it, you can size it by dragging its sizing handles or using the Properties panel.
Note The array input tool will only appear on models that have arrays defined.
Note The array input does the entire array with a page for each 2 dimensional sub array. Use the group input to get specific array elements.
The array input is intended to make it very easy to set up complete arrays. Therefore it has very few properties.
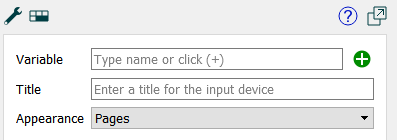
Variable specifies the variable you want to use the input for. This should be a variable name with no array dimensions specified. Use the ![]() to open the Find window to select, or simply type in the variable name.
to open the Find window to select, or simply type in the variable name.
Title specifies the title that will appear at the top of the list of inputs. The title will be the same for every page. If left blank, the label for the current 2 dimension sub-array will be display (eg pop[1,1,*,*], pop[1,2,*,*] and so on).
Appearance sest the page selection type. The number of pages will be determined by the array dimension. See Pages Styles for more discussion of the page selection types.
Note For arrays of 3 or more dimensions (which require multiple pages) it is recommended that you leave the title blank.
Set styles using the Styles ![]() tab as described in Styles Tab. In addition to position and size, you can specify the background color and, separately, the fonts for text and header text.
tab as described in Styles Tab. In addition to position and size, you can specify the background color and, separately, the fonts for text and header text.
Note that styles are the same for every page.