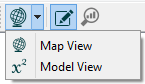
To switch between ‘Map View’ (where you can’t enter equations) and ‘Model View’ (where you can edit) use the buttons on ‘The Panel’ or in the ‘Model Toolbar’.
To move items around the ‘Model Diagram’ click and drag any item, or group of items.
To resize an item, click once on it to make the resize handles show, and drag the resize handle  (extra tip: press and hold the Shift key to maintain the aspect ratio).
To move a name around a symbol click and drag on the variable name and you will be able to move it around the symbol (extra tip: press and hold the Shift key for additional precision).
To undo any mistakes press Ctrl+Z [Windows] or ⌘+Z [Mac].
When dragging a Flow or Connector arrowhead press the shift key to drop an anchor point.
To connect a Connector or a Flow drag the arrowhead over the item you would like to connect to. If you can connect the items the item will highlight.
 onto the Graph or Table.
 you can access the panel and change object settings. In ‘Edit mode’ symbols on the stock and flow diagram do not contain any graphs. ‘Edit mode’ is used when constructing your model.
 you cannot access the panel or change object settings. In ‘Explore mode’ symbols on the stock and flow diagram contain graphs and cannot be moved or changed in any way. ‘Explore mode’ is used to examine model results.
 Panel.
 size for Converters.
 for your variables.
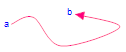
 panel – this will ensure that your formatting is used in all Graphs and Tables by default.
 option.
 .
. – dock the ‘Results Panel’ to the Stella Professional window.
 in the ‘Run Toolbar’ to see data on the diagram at any point in time.
 .
. button to open a new window which allows you to enter equations for user selected sub-range.